
最近、Unity Automotive HMI Template の構成に慣れることを目的に、車載 HMI の小さな制作練習に取り組みました。テンプレート内の車両データ、表示コンポーネント、操作処理がどのようにつながっているかを理解するため、MINI OS 9 の円形インターフェースを題材に、UI の描き起こしとデータの接続を進めました。
I recently worked on a small automotive HMI exercise to become familiar with the structure of Unity Automotive HMI Template. Using the circular MINI OS 9 interface as a reference, I redrew the UI and connected it to the template’s data to understand how vehicle data, display components, and controls work together.
Unity Automotive HMI Template は、メーター、車載インフォテインメント、空調などの UI を含む、Unity の車載インターフェース開発サンプルです。複数画面の管理や車両の状態データの扱いを学ぶ出発点になります。
Unity Automotive HMI Template is a Unity sample project for automotive interfaces, including instrument clusters, infotainment, and climate controls. It provides a starting point for learning how to manage multiple displays and work with vehicle state data.
MINI OS 9 は、円形 OLED ディスプレイと多彩な体験モードでブランドの個性を表現する MINI の車載システムです。今回は ICON INCAR のインターフェースデザインを参考に、円形の画面に情報や操作部品を配置する練習をしました。
MINI OS 9 is MINI’s in-car system, expressing the brand’s character through a circular OLED display and a range of experience modes. For this exercise, I used ICON INCAR’s interface design as a reference for arranging information and controls within a circular screen.
制作前には、円形のレイアウト、情報の優先順位、操作方法を整理しました。そのうえで ICON INCAR のデザイン事例と、HMI Gallery — Mini Electric HMI にまとめられた詳細なスクリーンショットや映像を参考に、自分で UI を描き起こして、テンプレートに組み込む練習用の画面を作りました。
Before implementation, I reviewed the circular layout, information hierarchy, and interactions. I then studied ICON INCAR’s design case study and the detailed screenshots and videos collected on HMI Gallery — Mini Electric HMI, and redrew the UI myself as a practice interface to integrate with the template.
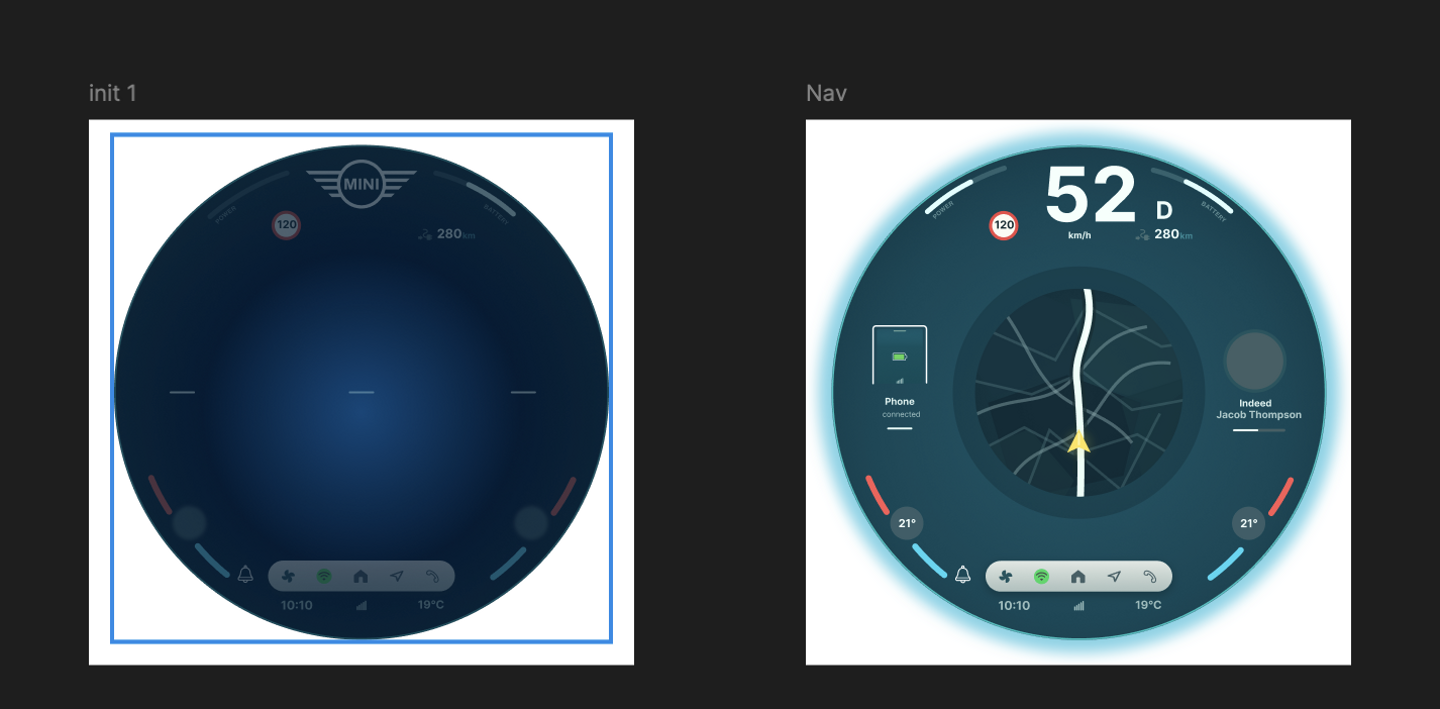
実装では、テンプレートの VehicleService をたどって車両データの取得元を確認し、速度・ギア・航続距離を描き起こした画面に接続しました。既存の加速・ブレーキ・ギア切り替えの操作と組み合わせ、操作による状態の変化が画面に反映される流れを確認しました。また、Unity 上でクリックやドラッグに対応した円弧状の UI スライダーを実装し、塗りつぶし範囲とハンドルの位置が連動して更新されるようにしました。
During implementation, I traced the template’s VehicleService to understand where the vehicle data came from, then connected speed, gear, and remaining range to the redrawn interface. Using the existing acceleration, braking, and gear controls, I followed how user input changes the vehicle state and how those changes appear on screen. I also implemented an arc-shaped UI slider in Unity that responds to clicks and dragging, keeping its fill and handle position in sync.
今回の小さな練習を通して、HMI Template における「データの取得元・画面表示・操作処理」の関係を、より具体的に理解できました。画面の置き換え、データの接続、独自の操作部品の追加を通じてテンプレートの構成に慣れることが、今後の HMI 制作に向けた一歩になりました。
This small exercise helped me better understand the relationship between data sources, display components, and controls in HMI Template. Replacing the interface, connecting data, and adding a custom control gave me hands-on familiarity with the template’s structure and a foundation for further HMI practice.
デザインの出典について:本制作は、ICON INCAR の MINI OS 9 インターフェースを視覚表現と操作の参考にし、関連する UI を自分で描き起こして Unity でインタラクティブなプロトタイプを実装した、個人学習のための練習です。元のデザインの権利は原制作チームに帰属し、MINI または ICON INCAR から依頼されたプロジェクトではありません。
Design attribution: This is a personal learning exercise using ICON INCAR’s MINI OS 9 interface as a visual and interaction reference. I redrew the relevant UI and implemented an interactive prototype in Unity. Rights to the original design remain with its creators. This project was not commissioned by MINI or ICON INCAR.
参考資料 / References: