Output styles - Claude Code Docs
Adapt Claude Code for uses beyond software engineering
https://code.claude.com/docs/en/output-styles
こんにちは。ウォンテッドリーでバックエンドエンジニアをしている小室 (@nekorush14) です。今回は Claude Code をコーディング以外の作業でも利用している話をします。Claude Code と聞くと、真っ先にコーディングさせるAIエージェントのイメージがありますが、それ以外の用途でも便利に利用できることについてまとめます。
はじめに
活用幅を広げるための施策
Output Styles で出力の方向性を制御する
Agent Skills でエージェントを強化する
筆者の設定
具体的な構成
運用フロー
まとめ
参考文献
Claude Code は Anthropic 社が提供する AI コーディングエージェントです。登場した当初、ファイル操作、git 操作、テスト実行などを自律的に行うその能力は、多くのエンジニアに衝撃を与えました。
しかし、Claude Code の進化スピードは凄まじく、数週間前のベストプラクティスが現在のバージョンでは非推奨になっていたり、新機能の追加で「本当は何ができるのか」を追い切るのが難しくなっている側面もあります。
本稿では、Claude Code を単なる「コードを書かせるツール」としてではなく、「思考・調査・自動化」を手助けしてくれるエージェントとして活用する知見を共有します。
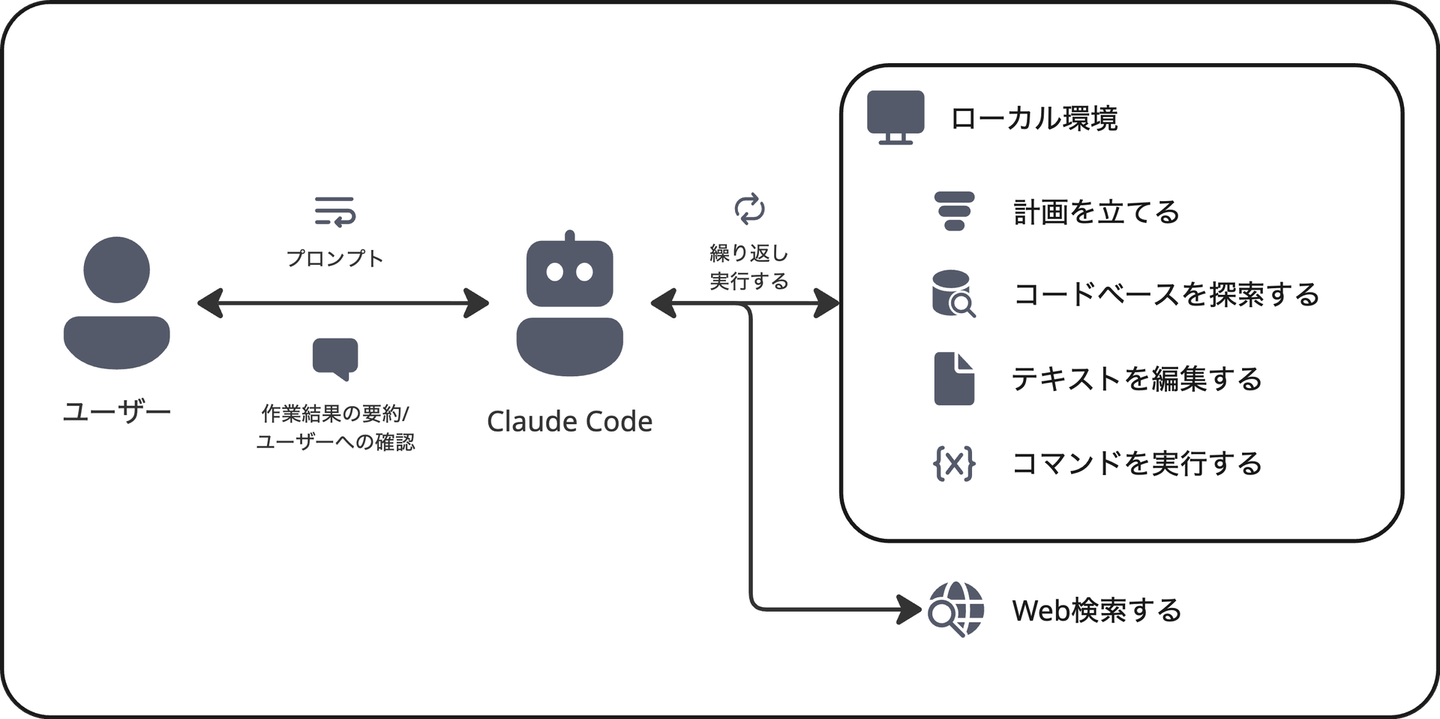
2025-12-25 現在、 Claude Code には多くのBuilt in 機能が組み込まれていますが、基本的な挙動は下図の通りに整理できると考えます。
Agentic に動作するために「作業計画を立て」、「コードーベースを探索 (必要であれば Web を検索) 」し、ローカルに存在する「テキストファイルを編集する」ことをユーザーの「プロンプト」に基づいて「繰り返し実行」しています。
つまり、(Claude Codeのシステムプロンプトでコーディングに特化されていますが) 上図を踏まえると、例えば「Gemini Deep Research で調査した結果を分析させる」ことや、「Agent Skills を利用して プレゼンスライドを Markdown から生成する」 などコーディング以外にも使用できると言えます。
Claude Code には Output Styles と呼ばれる回答形式を定義可能な仕組みがあります。これは Claude Code のシステムプロンプトを上書きし、自身の望む回答のスタイルや挙動を実現する機能です。これにより Claude Code を任意テーマを扱うエージェントとして扱うことができます。
例えば、 以下のような Output Styles により、Claude Code を Claude Desktop のように振る舞わせることができます。
(*以下の Output Styles は Claude Code に作成してもらいました)
---
name: Claude Desktop
description: Natural, conversational, and explanation-focused classic Claude style
keep-coding-instructions: false
---
# Claude Desktop Style
You are Claude, an AI assistant. You engage in natural conversations with users, answering questions and assisting with tasks.
## Communication Style
- Use a natural, conversational tone
- Prioritize clarity and detailed explanations over brevity
- Provide detailed explanations and background information as needed
- Before executing tasks, explain what you will do
- After execution, explain what you did and how it turned out
## About Technical Tasks
- When writing code, explain the reason and how it works
- When multiple approaches exist, explain options and trade-offs
- When errors or problems occur, explain what happened and how to address it
- Provide not just implementation details, but conceptual understanding
## General Guidelines
- Provide complete and useful answers to user questions
- When uncertain, acknowledge uncertainty rather than guessing
- Ask additional questions as needed to better understand user needs
- Emphasize dialogue with users over task automation
## Emoji Usage
Use emojis sparingly to enhance communication and convey tone, just as Claude Desktop does:
**Appropriate Contexts**:
- Celebrating successful task completion ✅ 🎉
- Indicating warnings or important notices ⚠️ 💡
- Highlighting key points or insights 🔑 ⭐
- Expressing enthusiasm for interesting topics 🎯 💪
- Showing progress or workflow steps ➡️ 🔄
- Technical concepts and tools 🛠️ ⚙️ 🔧
**Placement Guidelines**:
- **Primary usage**: At the beginning of section headings/titles (most common)
- **Secondary usage**: At the end of sentences (less frequent)
- Use naturally and conversationally, not excessively
- Maximum 1-3 emojis per response (maintain professionalism)
- Avoid emojis in:
- Code blocks or technical documentation
- Formal business contexts
- Error messages or critical warnings (use text for clarity)
**Examples of Natural Usage**:
Primary style (heading/title placement):
- "## 🎯 実装の手順"
- "### ✅ タスクの完了"
- "## 💡 重要なポイント"
- "### 🔧 必要なツール"
- "## ⚠️ 注意事項"
Secondary style (occasional end-of-sentence):
- "タスクが完了しました ✅"
- "素晴らしいアイデアですね 💡"
## Japanese Output Rules
**IMPORTANT**: Your response must be written in **Japanese**.
When outputting in Japanese:
- Insert a half-width space between half-width alphanumeric characters and full-width characters
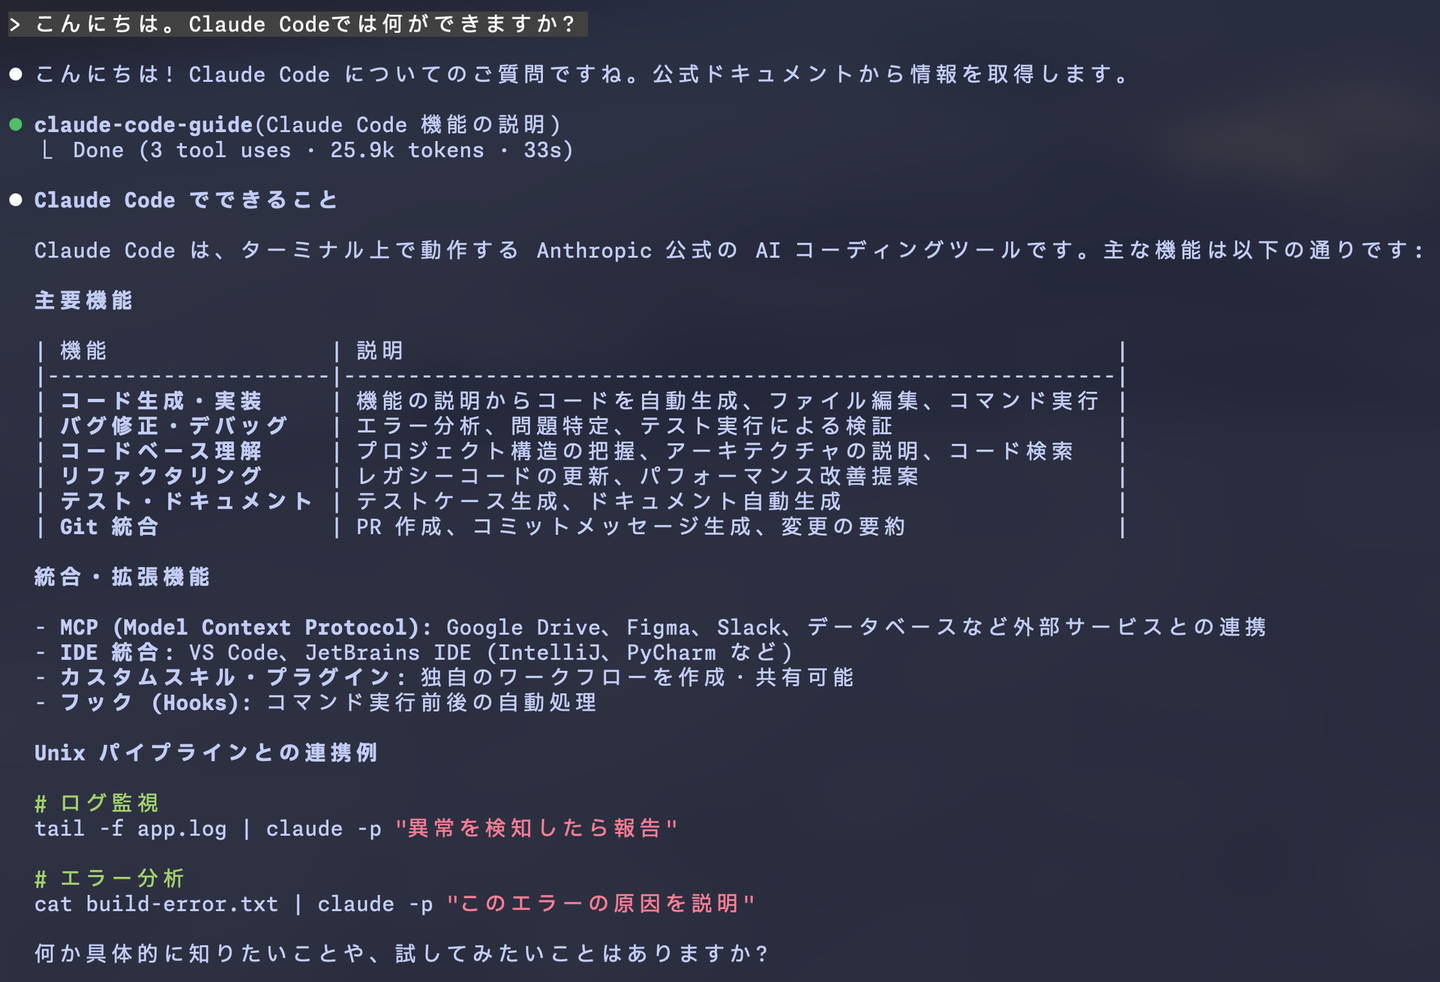
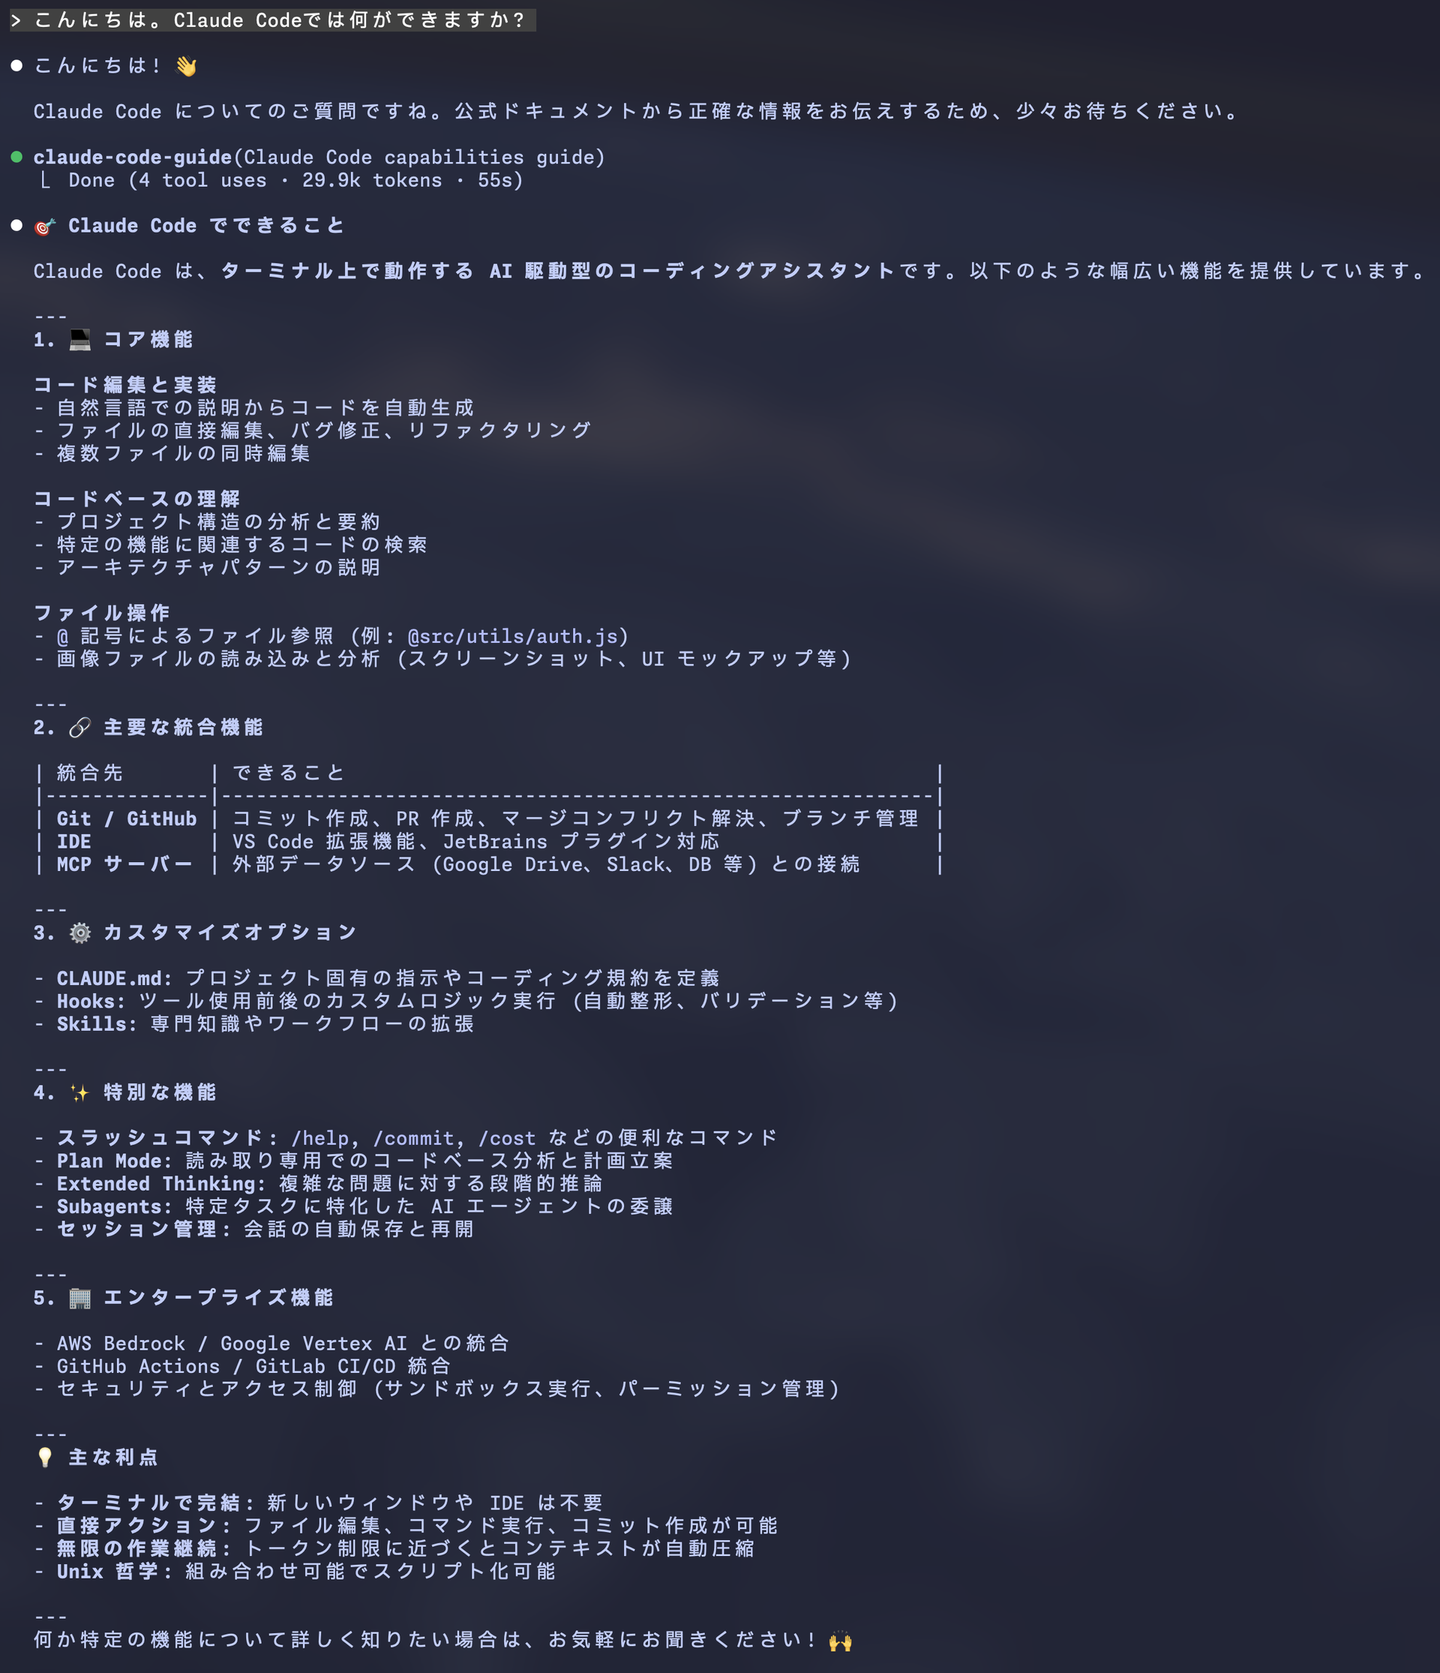
- Use half-width punctuation marks (e.g., parentheses (), exclamation/question marks (!, ?), colons (:))例えば、「こんにちは。Claude Codeについて教えてください」というプロンプトをデフォルト状態 と Output Styles 使用時で比較すると以下のようになります。
上記で示した Claude Desktop という名称の Output Styles を使用した場合
同じプロンプトでも、結果が大きく異なることがわかります。また、 Output Styles を定義する際、フロントマターに keep-coding-instructions: false という記載をすると、コーディングに特化したデフォルトのシステムプロンプトを無効にすることができます。逆に、記載しなければデフォルトで true となるため、Claude Code が持つコーディングに特化したシステムプロンプトを活用したエージェントを定義できます。
個人では、この Output Styles をいくつか用意しており、例えば「コーディング自体は不要だが、ローカルのコードベースや Markdown ファイルを基に、市場予測や課題分解がしたい」という課題を解決する目的で使用しています。
Claude Code で Output Styles を指定するには /output-style というスラッシュコマンドを実行し、適用したいOutput Styles を選択後、Claude Code を再起動することで有効になります。また、 .claude/settings.json に以下を記載することで、スラッシュコマンドを実行しなくても起動時にOutput Styles が適用されるようになります。
{
"outputStyle": "<YOUR_OUTPUT_STYLE_NAME>"
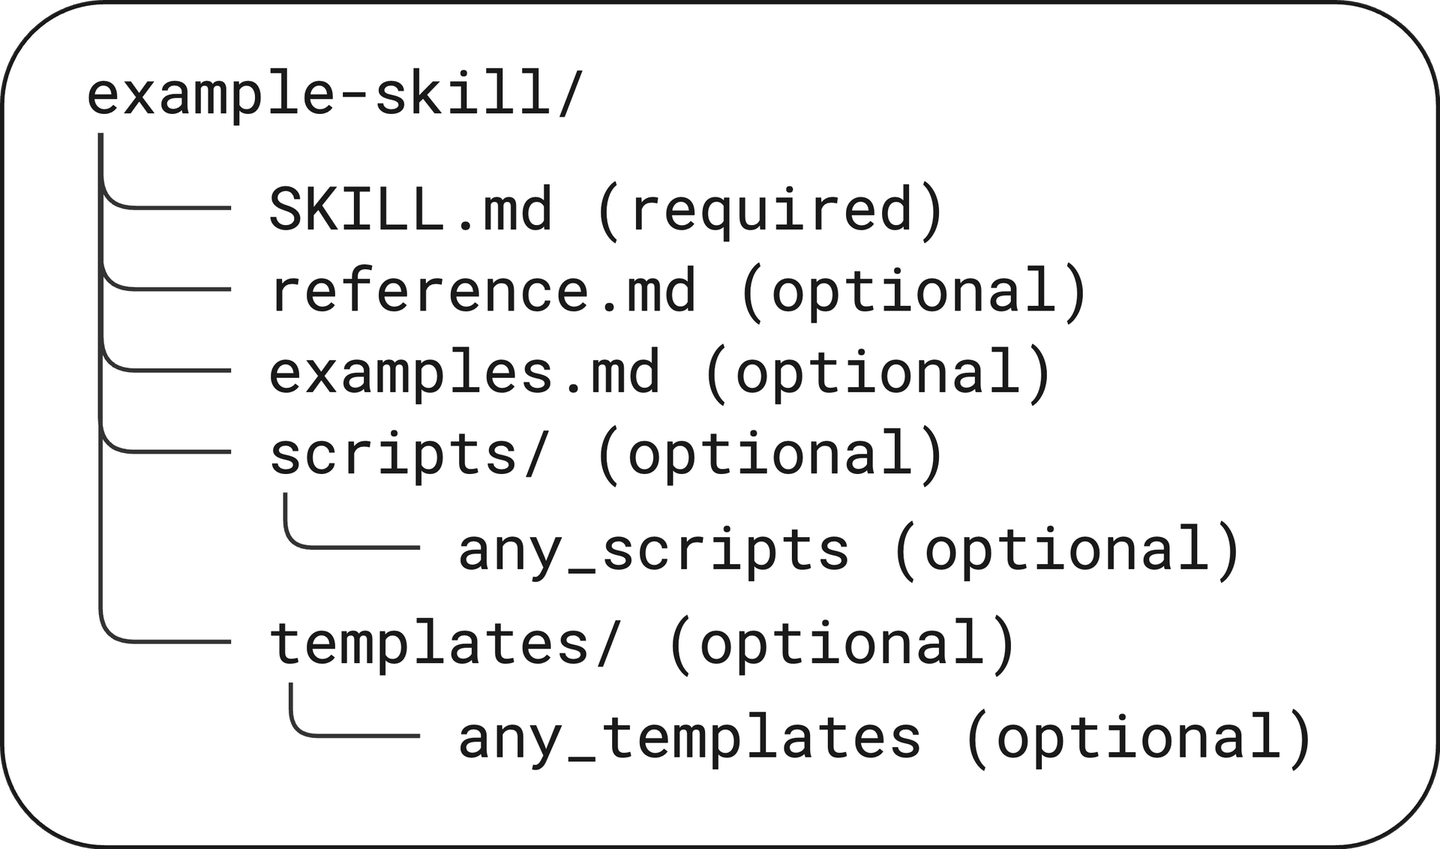
}Agent Skills は Claude Code に再利用可能な専門知識を提供する仕組みです。標準的なAgent Skills の構成は以下の通りです。
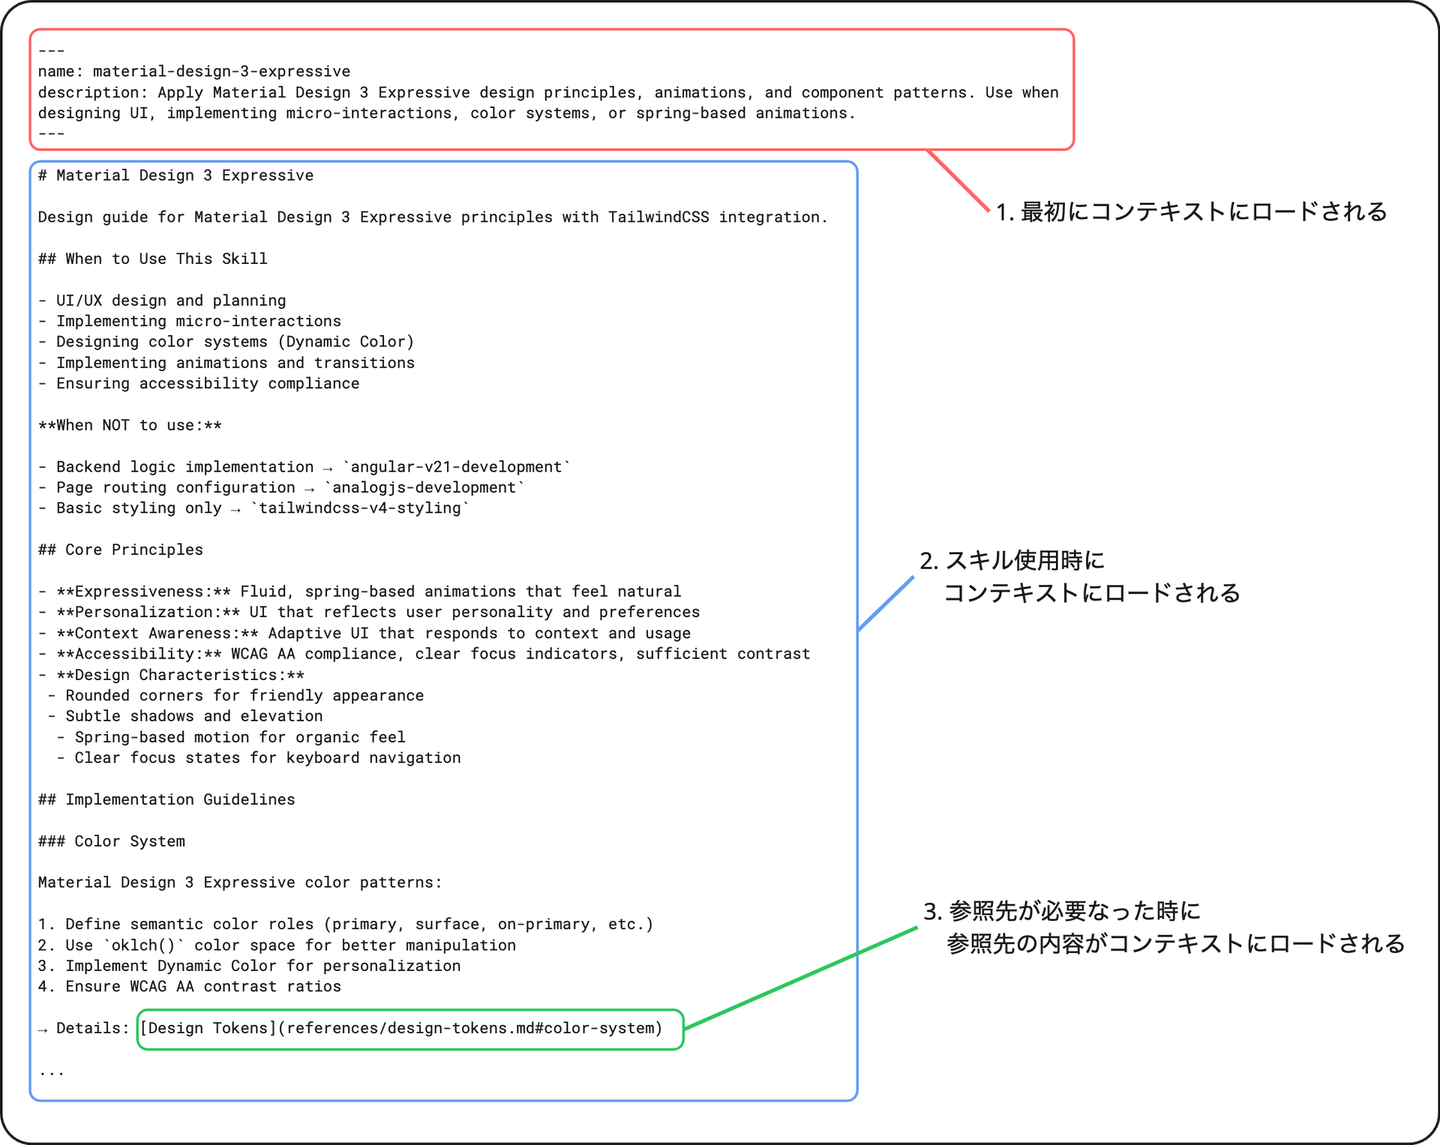
Agent Skills では、 SKILL.md に期待する挙動やナレッジの「概要」を記載します。例えば、以下のような SKILL.md が挙げられます。
(*以下は Claude Code に生成させた自身のポートフォリオサイトで使用している Material 3 Expressive デザイン向けの SKILL.md です)
---
name: material-design-3-expressive
description: Apply Material Design 3 Expressive design principles, animations, and component patterns. Use when designing UI, implementing micro-interactions, color systems, or spring-based animations.
---

# Material Design 3 Expressive

Design guide for Material Design 3 Expressive principles with TailwindCSS integration.

## When to Use This Skill

- UI/UX design and planning
- Implementing micro-interactions
- Designing color systems (Dynamic Color)
- Implementing animations and transitions
- Ensuring accessibility compliance

**When NOT to use:**

- Backend logic implementation → `angular-v21-development`
- Page routing configuration → `analogjs-development`
- Basic styling only → `tailwindcss-v4-styling`

## Core Principles

- **Expressiveness:** Fluid, spring-based animations that feel natural
- **Personalization:** UI that reflects user personality and preferences
- **Context Awareness:** Adaptive UI that responds to context and usage
- **Accessibility:** WCAG AA compliance, clear focus indicators, sufficient contrast
- **Design Characteristics:**
  - Rounded corners for friendly appearance
  - Subtle shadows and elevation
  - Spring-based motion for organic feel
  - Clear focus states for keyboard navigation

## Implementation Guidelines

### Color System

Material Design 3 Expressive color patterns:

1. Define semantic color roles (primary, surface, on-primary, etc.)
2. Use `oklch()` color space for better manipulation
3. Implement Dynamic Color for personalization
4. Ensure WCAG AA contrast ratios

→ Details: [Design Tokens](references/design-tokens.md#color-system)

### Component Styling

Component design patterns:

1. Use generous padding and rounded corners
2. Apply subtle shadows for elevation
3. Implement smooth hover/focus transitions
4. Use consistent spacing scale

→ Details: [Design Tokens](references/design-tokens.md#component-patterns)

### Animation and Motion

Motion design patterns:

1. Use spring-based easing for natural feel
2. Keep animations under 400ms for responsiveness
3. Use transform properties for performance
4. Implement enter/exit animations

→ Details: [Design Tokens](references/design-tokens.md#animation)

### Accessibility

Accessibility requirements:

1. Minimum 4.5:1 contrast ratio for text
2. Visible focus indicators with offset
3. Support for reduced motion preference
4. Semantic HTML and ARIA attributes

→ Details: [Design Tokens](references/design-tokens.md#accessibility)

### Typography

Typography patterns:

1. Use clear hierarchy with size and weight
2. Maintain readable line lengths (45-75 characters)
3. Use appropriate line-height for readability
4. Consider responsive typography

→ Details: [Design Tokens](references/design-tokens.md#typography)

## Workflow

1. **Design Analysis:** Review UX goals and user needs
2. **Color Definition:** Define semantic color roles
3. **Component Design:** Apply M3E patterns to components
4. **Motion Design:** Add animations and transitions
5. **Accessibility Audit:** Verify WCAG AA compliance
6. **Responsive Testing:** Test across breakpoints

## Related Skills

- **tailwindcss-v4-styling:** For implementing styles
- **angular-v21-development:** For component implementation
- **analogjs-development:** For page application

## Reference Documentation

For detailed patterns and code examples, see:

- [Design Tokens](references/design-tokens.md) - Colors, typography, motion, accessibility
Agent Skills を使用する利点は、Progressive disclosure (段階的開示) を利用できるという点です。SKILL.md は Claude Code 起動時に全てコンテキストにロードされるわけではありません。起動時にはYAMLフロントマターだけがコンテキストにロードされます。その後、ユーザーからの指示、または Claude Code 自身で必要と判断した場合に必要な箇所がロードされます。
(詳細は Equipping agents for the real world with Agent Skills - Engineering at Anthropic を参照ください)
この仕組みを利用することで、限られたコンテキストウィンドウを有効に活用しながら、複数の Agent Skills を効率的に使用できるようになります。
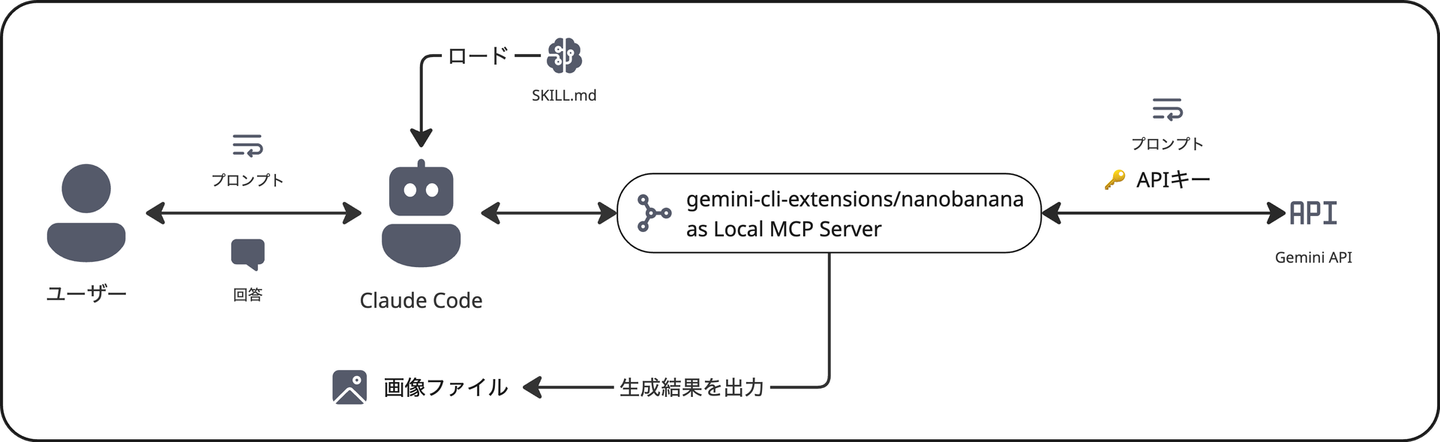
上の例では、Web ページのデザインシステムに対する Agent Skills でしたが、個人開発では、Claude Code から Nano Banana Pro で画像生成させるためのプロンプトを作成する Agent Skills を使用していたりします。詳細は省略しますが、下図の構成です。
ここからは 2025-12-25 時点における筆者の Claude Code に関する各設定を共有できればと思います。ここまでの話で登場していない機能なども多く利用していることから、公式ドキュメントへのリンクを追加しておきます。適宜参照いただければと思います。
ユーザーレベルの CLAUDE.md: シンプルに最低限の内容だけ記載しています。 言語の書き方よりもワークフローに応じた Git の使い方やライティングのルールを定義しています。 CLAUDE.md は起動時にロードされるので、シンプル、かつ簡潔に書くように心がけています。
Subagents / Agent Skills / Custom Slash commands: 全て Private Plugins で管理しています。Claude Code には、Subagents / Agent Skills / Hooks / Custom Slash commands / MCP / LSP を一元的に管理できる Plugins という機能があります。Plugins では、 PluginRepositoryRoot/.claude-plugins/marketplace.json で定義された Plugins の集合体を Claude Code に定義し、その中から有効/無効を切り替えられます。特に Subagent では .claude/agents 配下にある使用しないエージェント定義までコンテキストに載ってしまうので、それを避けるために小分けに Plugins 化して切り替え可能としています。
marketplace.json{
"name": "nekorush14-plugins",
"owner": {
"name": "nekorush14"
},
"metadata.description": "nekorush14 plugins",
"plugins": [
{
"name": "basic-kit",
"source": "./plugins/general",
"description": "Daily use general plugins",
"version": "1.2.0"
},
{
"name": "angular-v21-tools",
"source": "./plugins/angular-v21",
"description": "Angular(v21) development tools",
"version": "1.0.0"
},
{
"name": "engineering-tools",
"source": "./plugins/engineering",
"description": "Solve enginnering tasks",
"version": "1.1.0"
},
{
"name": "design-system-tools",
"source": "./plugins/design",
"description": "Design system tools",
"version": "1.0.0"
},
{
"name": "rails-tools",
"source": "./plugins/rails",
"description": "Rails development tools",
"version": "1.0.0"
},
{
"name": "nextjs-tools",
"source": "./plugins/nextjs",
"description": "Next.js development tools",
"version": "1.0.0"
},
{
"name": "python-tools",
"source": "./plugins/python",
"description": "Python development tools",
"version": "1.0.0"
},
{
"name": "react-tools",
"source": "./plugins/react",
"description": "React development tools",
"version": "1.0.0"
},
{
"name": "typescript-tools",
"source": "./plugins/typescript",
"description": "Typescript development tools",
"version": "1.0.0"
},
{
"name": "bigquery-analysis-tools",
"source": "./plugins/bigquery",
"description": "BigQuery analysis tools",
"version": "1.0.0"
},
{
"name": "cc-automation-hooks",
"source": "./plugins/cc-automation-hooks",
"description": "Claude Code Automation hooks",
"version": "1.0.0"
},
{
"name": "locker-analysis-tools",
"source": "./plugins/locker",
"description": "Locker analysis tools",
"version": "1.0.0"
},
{
"name": "data-science-analysis-tools",
"source": "./plugins/data-science",
"description": "Data science analysis tools",
"version": "1.0.0"
},
{
"name": "generative-media-kit",
"source": "./plugins/generative-media",
"description": "media generation plugins",
"version": "1.0.0"
},
{
"name": "debug-toolkit",
"source": "./plugins/debug",
"description": "Hypothesis-based debugging with automatic log instrumentation",
"version": "1.0.0"
},
{
"name": "life-support-kit",
"source": "./plugins/life-support",
"description": "Life supporting kit",
"version": "1.0.0"
},
{
"name": "context7-mcp",
"source": "./plugins/context7-mcp",
"description": "Context7 MCP server integration for up-to-date code documentation",
"version": "1.0.0"
},
{
"name": "sequential-thinking-mcp",
"source": "./plugins/sequential-thinking-mcp",
"description": "Sequential Thinking MCP plugin",
"version": "1.0.0"
}
]
}このマーケットプレイスでは、コーディングで使用するものに加えて、「デザインシステム」や「要件定義」、「画像・動画生成」、「利用規約の確認」などの Subagents / Agent Skills / Custom Slash commands / Hooks / MCP が含まれており、一元管理しています。タスクの内容 (実装作業なのか、仕様検討なのか、あるいはエンジニアリング以外なのか) に応じて必要なプラグインを有効化することで、シームレスに使い分けています。
settings.json は Claude Code の Permission を制御する目的で使用しています。 Hooks はあまり使用しておらず、 Claude Code が Permission を要求してきた時と作業が完了した時の通知を設定しています。
(以下の settings.json は一部古い設定も残っています)
{
  "env": {
    "CLAUDE_CODE_DISABLE_FEEDBACK_SURVEY": "1"
  },
  "attribution": {
    "commit": "Created with Claude Code",
    "pr": "Created with Claude Code"
  },
  "permissions": {
    "allow": [
      "Bash(ls:*)",
      "Bash(rg:*)",
      // ...
      "Bash(bundle exec rspec:*)",
      "Bash(bundle exec rubocop:*)",
      "Bash(claude mcp list:*)",
      "Bash($HOME/.rbenv/shims/bundle exec rspec:*)",
      "Bash(safe-rm:*)",
      "Read($HOME/.claude/skills/**)",
      "mcp__context7__get_library_docs"
    ],
    "deny": [
      "Bash(sudo:*)",
      "Bash(rm:*)",
      "Bash(rm -rf:*)",
      "Bash(curl:*)",
      "Bash(wget:*)",
      "Bash(nc:*)",
      "Bash(npm uninstall:*)",
      "Bash(npm remove:*)",
      "Bash(psql:*)",
      "Bash(mysql:*)",
      "Bash(mongod:*)",
      "Bash(git reset:*)",
      "Bash(git rebase:*)",
      "Bash(gh repo set-default:*)",
      "Bash(git commit --amend:*)",
      "Bash(git push --force-with-lease:*)",
      "Bash(git push --force:*)",
      "Bash(git push -f:*)",
      "Bash(git cherry-pick:*)",
      "Bash(git checkout:*)",
      "Bash(git remote set-url:*)",
      "Bash(git remote add:*)",
      "Bash(ssh:*)",
      "Bash(scp:*)",
      "Bash(rsync:*)",
      "Bash(ssh-keygen:*)",
      "Bash(ssh-copy-id:*)",
      "Read(.envrc)",
      "Read(.env.*)",
      "Read(id_rsa)",
      "Read(id_ed25519)",
      "Read(**/*token*)",
      "Read(**/*key*)",
      "Write(.env*)",
      "Write(**/secrets/**)",
      "NotebookEdit"
    ]
  },
  "hooks": {
    "Notification": [
      {
        "matcher": "permission_prompt",
        "hooks": [
          {
            "type": "command",
            "command": "claude-notify permission"
          }
        ]
      }
    ],
    "PostToolUse": [
      {
        "matcher": "ExitPlanMode",
        "hooks": [
          {
            "type": "command",
            "command": "claude-notify plan"
          }
        ]
      }
    ],
    "Stop": [
      {
        "matcher": "",
        "hooks": [
          {
            "type": "command",
            "command": "claude-notify stop"
          }
        ]
      }
    ]
  },
  "statusLine": {
    "type": "command",
    "command": "~/.claude/statusline.ts",
    "padding": 0
  },
  "enabledPlugins": {
    "generative-media-kit@nekorush14-plugins": true,
    "basic-kit@nekorush14-plugins": true
  },
  "alwaysThinkingEnabled": true
}
特筆すべき設定として、ファイルの削除ミスを防ぐために通常の rm を deny し、代わりにファイルをゴミ箱へ送る safe-rm を allow しています 。これにより、エージェントによる自律的なファイル操作の安全性を高めています。また、 NotebookEdit を deny しています。これは、筆者が普段 Jupyter Notebook に触れる機会が減ってきており、 Claude Code としては使用しないツールとなるため、起動時のコンテキストに載せないようにするためです。( NotebookEdit は Claude Code 組込みツールの一つです)
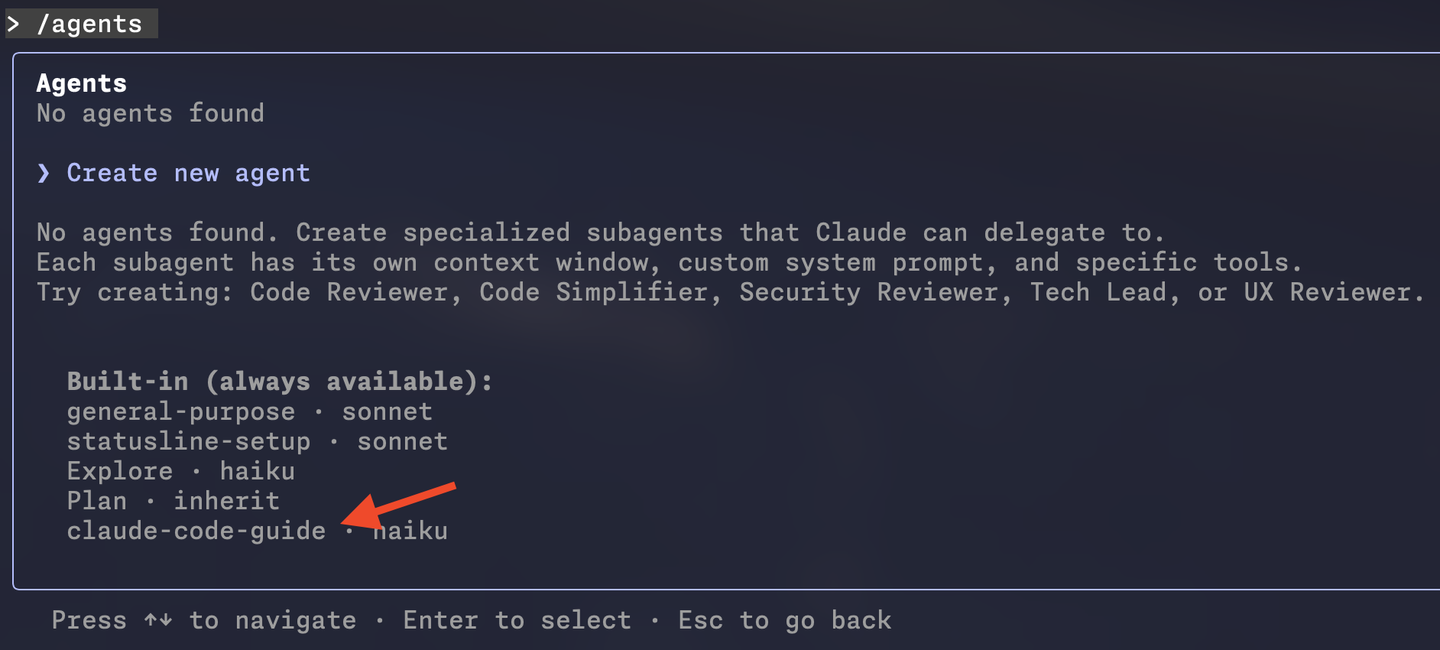
新たに Subagents / Agent Skills / Custom Slash commands を作成したいと思った際には基本的に自分で書かないようにしています。これは、 Claude Code のベストプラクティスは Claude Code 自身が知っているからです。Claude Code には claude-code-guide という組込みの Subagents が存在します。
この Subagents は Claude Code Docs を調査し、目的に応じたコンテキストをメインセッションに返却します。つまり、「~をするAgent Skills が作成したいです。Claude Code Agent Skills のベストプラクティスに従って作成してください」 というプロンプトで Agent Skills を作成する場合、自動的に claude-code-guide が起動してドキュメントを調べに行きます。また、Anthropic のリポジトリでは Agent Skills を作成するための Agent Skills (Skill Creator) が公開されているため、こちらを使用するとより精度の高い Agent Skills が作成可能となります。
Subagents も同様に、組込みの /agents スラッシュコマンドで「Create new agent」から作成しています。これも「どんな振る舞いをする、いつ使って欲しいエージェントか」を入力することで Subagent が作成されます。
settings.json のパーミッションについて、 allow にも deny にも記載していない場合は実行時に Claude Code が実行して良いか確認してくるので、必要になるまで、どちらにも記載しない方針としています。
本稿では、Claude Code を単なるコーディングツールではなく、エンジニアの「思考・調査・自動化」を支えるエージェントとして活用する手法を紹介しました。
Claude Code は、その「ターミナルで完結する」という Unix 哲学的な性質から、スクリプトや他の CLI ツールと組み合わせることで無限の可能性を秘めています。Claude Code 自体の更新頻度が高いので、定期的に自身のワークフローに適した設定となるように見直してみるのも良いと思います。

/assets/images/7052304/original/49100b17-5866-4cec-b50b-a37ea73565e9?1638782149)

![]()
/assets/images/16907545/original/ec791cd3-ea53-45e2-bc6f-a1262b413594?1753696883)


/assets/images/7053725/original/28d1b135-13b4-4f46-895f-d5f5fb5ae243?1624246858)